
Exercise & the Immune System (2): Releasing the Psoas & Spine
 Elisabeth Veltman, The Tender Foodie tagged Email Article Print Article Share Article in Exercise, Health
 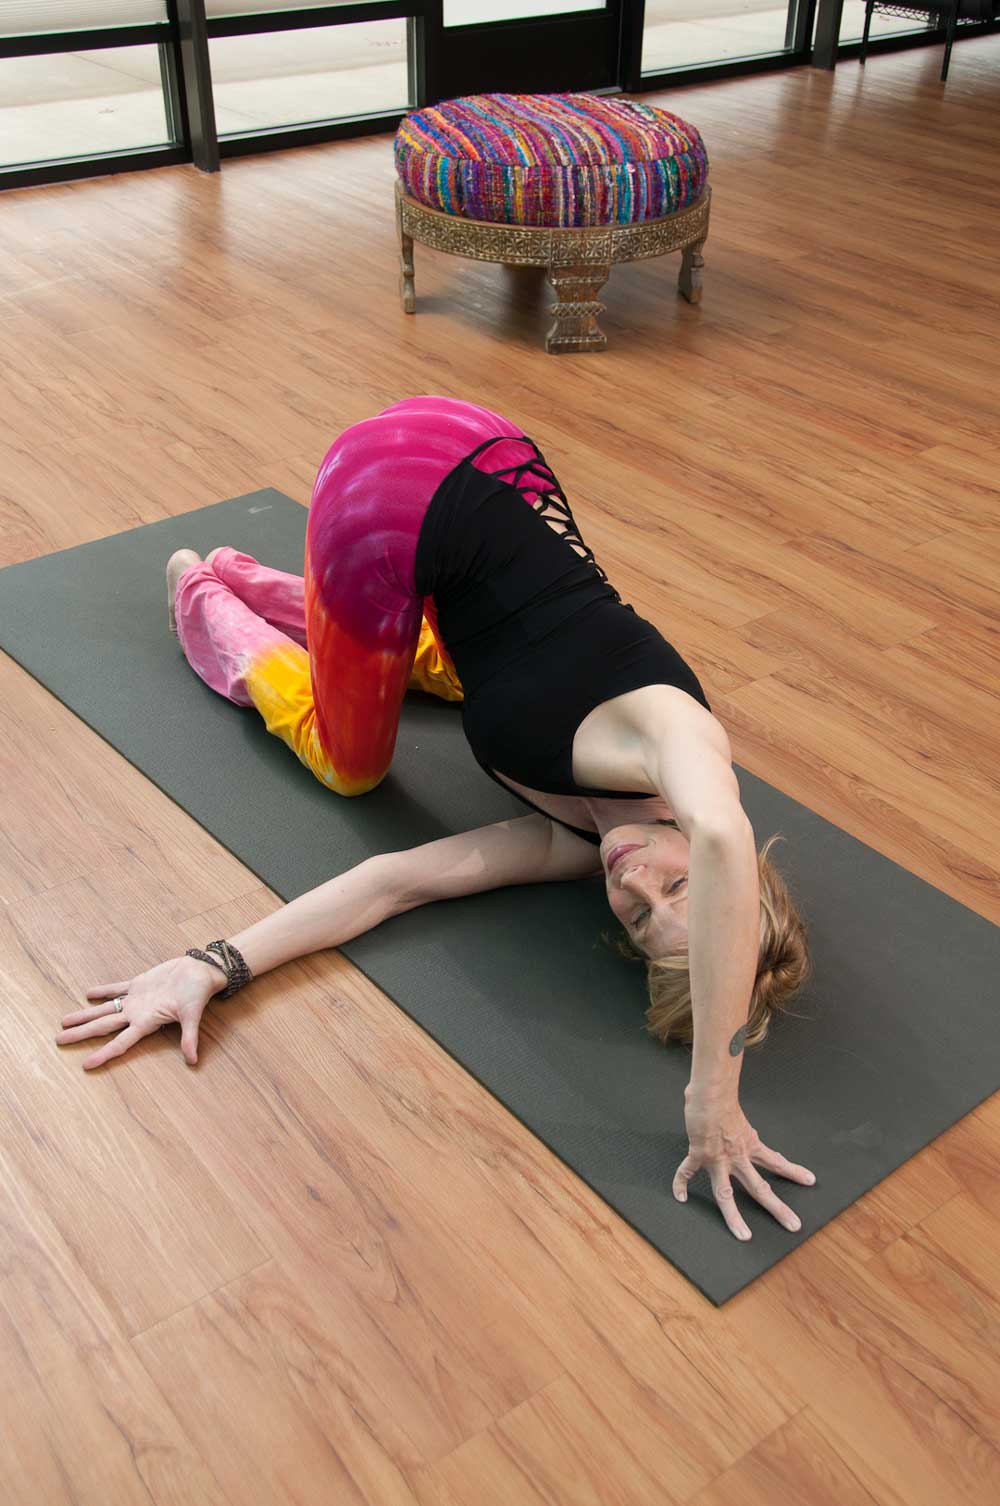 PICTURED: Melanie McQuown, PeaceLab Yoga. PHOTOS COURTESY OF: Daniel E. Johnson, Wealthy Street Photography
This is part of a series to help those of us with stressed immune systems get moving and connect to our inner kitten... or tiger... or raaaaahr.... In, "Exercise & The Immune System: Get Your Sexy Back", I chatted with Keri Topouzian, D.O., FACOEP about how exercise supports immunity, and why challenging our bodies is so important.
PLEASE NOTE: BEFORE TRYING ANY NEW EXERCISE ROUTINE, PLEASE CHECK WITH YOUR DOCTOR and work with an EXPERIENCED YOGA INSTRUCTOR. Some of these poses, especially twists, may not be appropriate for those with osteoperosis or disc degeneration.
In this article, we'll look at the elusive psoas muscle and how to support it. Melanie McQuown, owner of PeaceLab Yoga, will take us through a series of yoga poses that will help release lower back pain, aid digestion, and release the lower ribs, hips, butt and spine - all by paying attention to the mysterious psoas. Melanie is ERYT 200 and RYT 500 certified, Anusara trained, and has been practicing yoga for almost 15 years, while teaching for seven.
Personally, I do this series nearly every night and sometimes in the morning when I have trouble getting my body to respond like I might need it to. This series can completely change my night, or my day. I hope you find it just as helpful!!
What is the Fight or Flight Muscle?
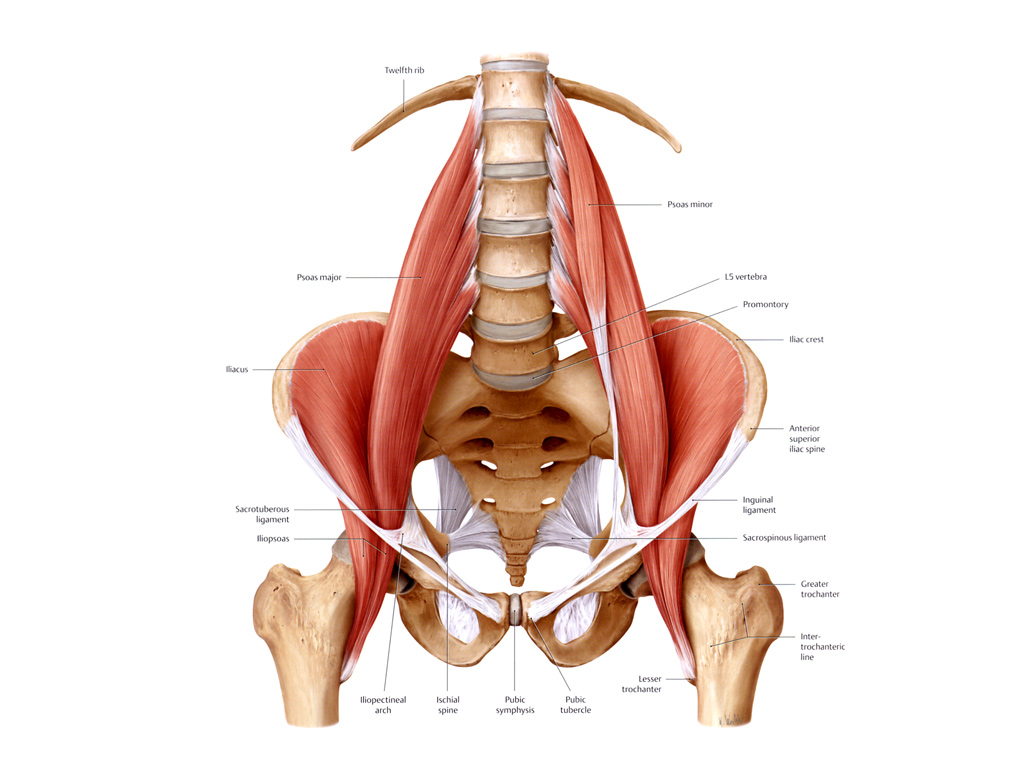 Fig 1: The Psoas MuscleThe psoas is a major muscle that is in charge of several complex actions like lifting your legs and even moving your intestines. Thus, it is called the Fight or Flight muscle. The psoas major attaches at the bottom of the thoracic spine (T12) and along the lumbar spine (through L4), then threads through the pelvic bowl, runs over the front of the hip joint, and attaches at the top of the femur (thigh bone). It is the only muscle that connects the spine to the leg, but it is much ignored because we can’t really see it. The psoas is also intimately connected to our adrenal glands, which makes this a very important muscle to release in today’s stress -filled culture.
Here are two videos that help illustrate the different parts of the psoas (psoas major & iliopsoas), and how it attaches.
THE PSOAS & FOOD ALLERGIES / SENSITIVITIES
What does the psoas have to do with food allergies? Most of our immune system (75%) is in our gut, and a healthy psoas is meant to massage our organs and intestines as we breathe and walk. During the fight or flight response (read more about "modern day bears" here), our intestines are told to shut down and all of our energy is diverted to the legs. This amazing design lets us run away from lions and tigers and bears, ah ha. If our body thinks it is in constant danger, and the psoas is chronically tight, chronic constipation and anxiety can ensue.
Conversely, if your intestines are inflamed because of food sensitivities, celiac disease, auto-immune issues, Irrittable Bowel Syndrome (IBS) or allergic reactions, this may also influence the psoas to tighten. Releasing the psoas can bring great relief.
PSOAS RELEASE FOR LOWER BACK PAIN
Experienced athletes, yogis, and newbies alike, can all experience lower back pain because of inflammation, prolonged sitting, or stooping. If back pain is your beast, this simple pose might just change your life. This is a therapeutic pose that helps release the psoas muscle.
A Note on Cobra Pose: I've practiced yoga for 15 years and have been having enourmous trouble with cobra pose (a back bending pose) because of lower back pain. Working this release with a ball can release the psoas and immediately bring back the full range of motion to your cobra. For me, it works every time.
![]() Fig 2: PICTURED: Melanie McQuown, PeaceLab Yoga. PHOTOS COURTESY OF: Daniel E. Johnson, Wealthy Street Photography
Fig 2: PICTURED: Melanie McQuown, PeaceLab Yoga. PHOTOS COURTESY OF: Daniel E. Johnson, Wealthy Street Photography
Figure 2 (above): Roll up a blanket like the one pictured above in Figure 2. Place the blanket at your hips so that it spans from hip to hip. Rest there for at least 90 seconds so the psoas has a chance to release.
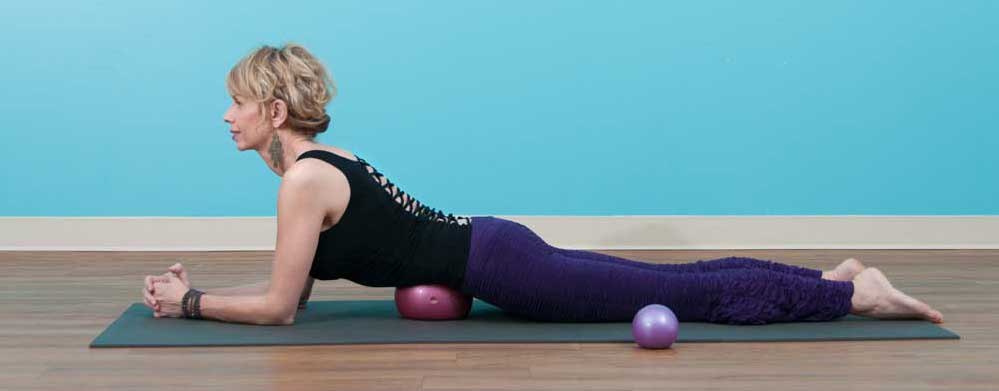 Fig 3: PICTURED: Melanie McQuown, PeaceLab Yoga. PHOTOS COURTESY OF: Daniel E. Johnson, Wealthy Street Photography
Figure 3 (above): If you don't feel anything using the blanket, or you would like to get deeper into the psoas, use a weighted ball at the center of your lower abdomen, between your hips. Rest for at least 90 seconds on the ball, then move to the right side, just before your hip bone, and then to the left side of your left hip bone. It takes about 90 seconds for any muscle to release, so breathe and stay in each position for a while if you can. If your psoas is really tight, this could be quite painful, but if you hang in there for a few seconds, you should feel the muscle start to release and feel better. As your psoas releases, you can use a smaller ball to get a deeper release. Pictured in use is the empower 6 lb medicine ball.
If the ball is too much, you can go back to the rolled up blanket (see Figure 2), and rest on it for as long as you like. Watch a re-run of "Friends", catch some football, or read a book.
Block Releases for Spinal Muscles
The belly of the piriformis muscle can be found wrapping around your sit or "butt" bone. It lies partly within the pelvis against its posterior wall, and partly at the back of the hip-joint. If this is tight, it can impinge on your sciatic nerve, and cause some shooting pain. It can also pull at your sacrum, the flat, triangular bone that lies just above your tail bone (see Figure 1). Again. Lower back pain.
I'm starting this next series with a piriformis release, as demonstrated by Melanie, because it gives fantastic relief that compliments the psoas releases that precede and follow. Use the block to go UP the muscles on either side of the spine and feel your breath flood into your body.
(You can also work with 2 tennis balls by placing them on the muscles along either side of the spine. Move the tennis balls in tandem an inch or two at a time from the tail bone all the way up to the neck).
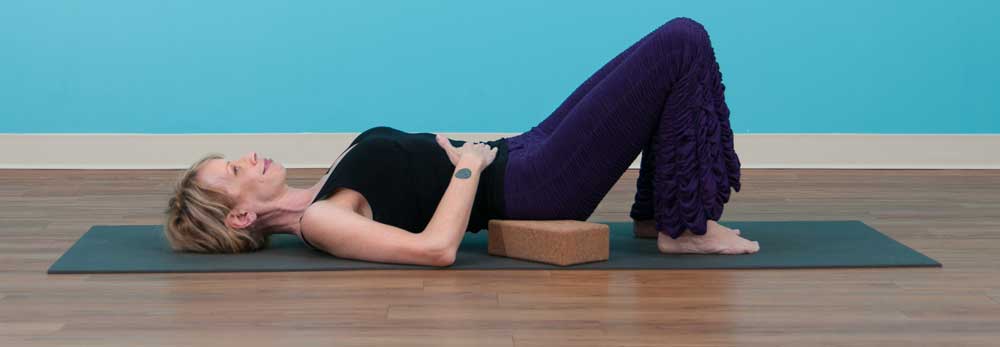 Fig 4: PICTURED: Melanie McQuown, PeaceLab Yoga. PHOTOS COURTESY OF: Daniel E. Johnson, Wealthy Street Photography
Figure 4 (above): Take either a cork or a hard foam yoga block and place the CORNER (yes, the corner) of it right next to your butt bone and on the piriformas. Let the rest of your body just drape off the block. Wait 90 seconds and then move it anywhere in that area where there is tightness. Repeat on the other side. You might feel a release all of the way up your spine and into your neck. Seriously.
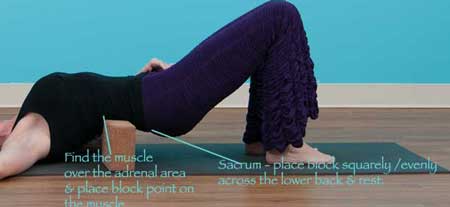 Figure 5: PICTURED: Melanie McQuown, PeaceLab Yoga. PHOTOS COURTESY OF: Daniel E. Johnson, Wealthy Street Photography
Figure 5, Position #1 (right, above): Move the block next a few inches up to the sacrum (please see the right pointer above for the position). Rest the entire block squarely and evenly from hip to hip under your lower back and directly onto the sacrum and relax. The psoas muscle will actually stretch and reveal itself a bit around your hip joints and you can gently massage it in this position.
Figure 5, Position #2: (left, above): Move the corner of the block to the large muscle on the right of the spine in the position indicated above left. Let your body drape over the corner of the block. Unlike position #1, Do NOT place directly on the spine here. Place it on either side of T12 to help release the very top of the psoas, and/or move in different positions along each side of the spine to release the erector spinae muscles - a bundle of muscles and tendons that run along either side of the spine.
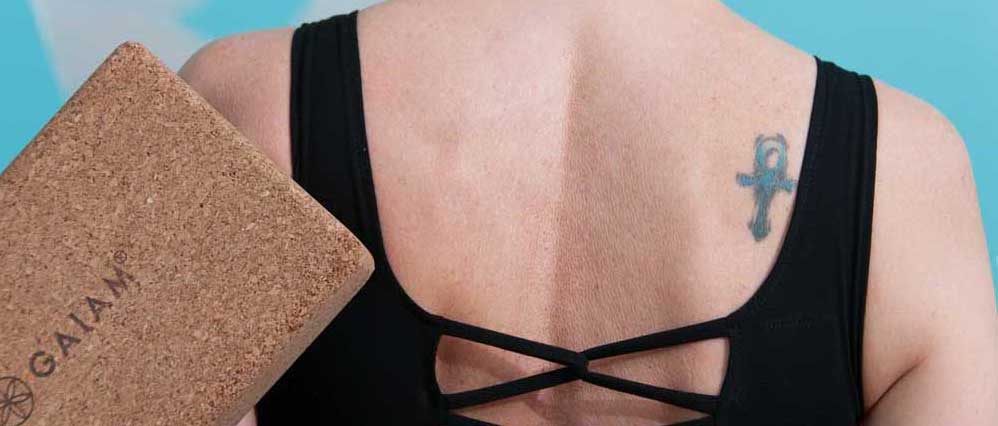 Figure 6: PICTURED: Melanie McQuown, PeaceLab Yoga. PHOTOS COURTESY OF: Daniel E. Johnson, Wealthy Street Photography
Figure 6 (above): The above spot can be a tricky one to find because it is actually a trigger point located in the terres minor muscle of the shoulder. But baby, it can release some major tension in the shoulder, arm, neck, jaw, and head. When you find it, you will know. So go slowly and when you hit a spot that "hurts so good" and is in the area of the photo above, place that spot on the corner of the block and rest there. Repeat on the other pressure point on the other shoulder.
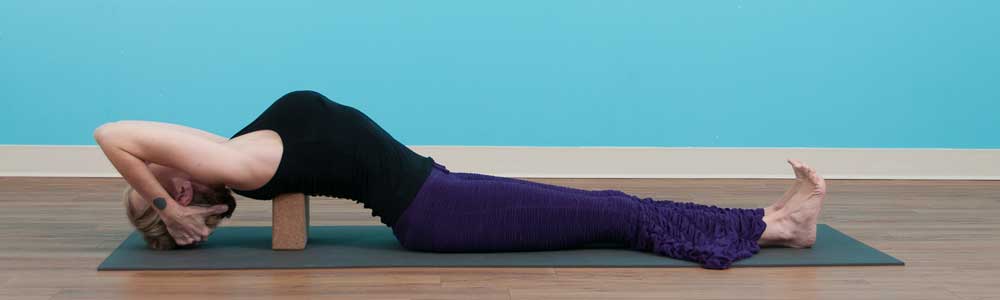 Figure 7: PICTURED: Melanie McQuown, PeaceLab Yoga. PHOTOS COURTESY OF: Daniel E. Johnson, Wealthy Street Photography
Figure 7 (above): Place the long end of block across the lower tips of both shoulder blades, right behind where your heart beats (as pictured above). Place your hands behind your head, gently, and "plug" the shoulders onto your back, while keeping your elbows closer to your head. This will lift your heart area up and give you a nice stretch in the upper spine.
GENTLE TWISTS
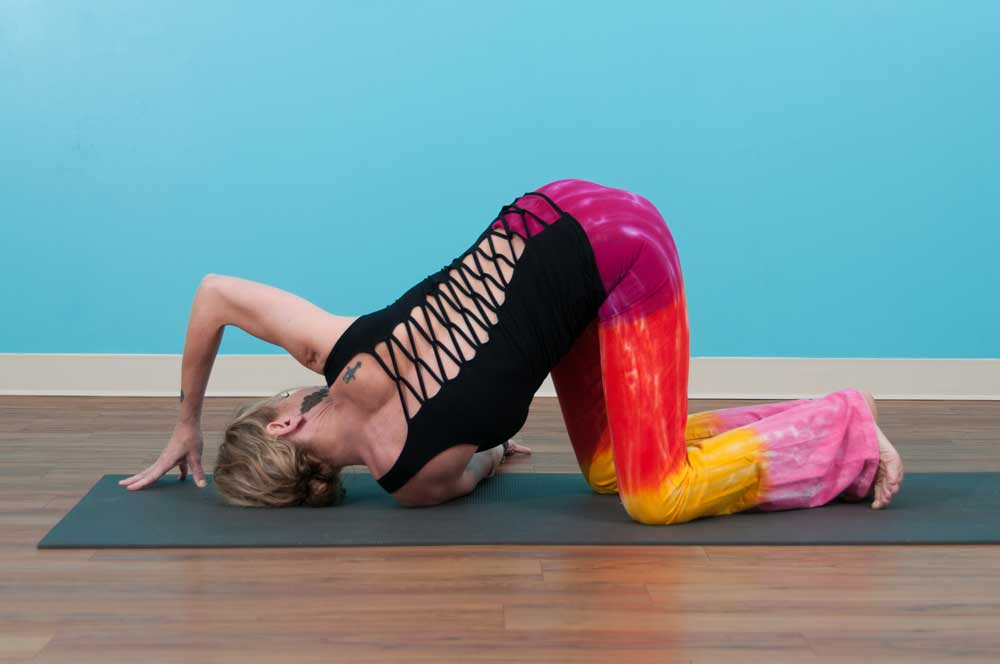 Figure 8: PICTURED: Melanie McQuown, PeaceLab Yoga. PHOTOS COURTESY OF: Daniel E. Johnson, Wealthy Street Photography
Figure 8 (above): Twisted Child Pose is a “cooling” pose as it settles the mind. It also increases blood flow to the core, organs, and spine and is a deep twist that helps move the intestines. Start by kneeling on your hands and feet. As you keep your hips very square and even, gently thread one arm underneath the other arm until you come to rest on your shoulder. Press down with knees, and press the threaded arm on the floor. Plug the shoulder of your opposite arm onto your back and come up on the finger tips of that, your top hand. Let yourself gently twist from your core.
![]() Figure 9: PICTURED: Melanie McQuown, PeaceLab Yoga. PHOTOS COURTESY OF: Daniel E. Johnson, Wealthy Street Photography
Figure 9: PICTURED: Melanie McQuown, PeaceLab Yoga. PHOTOS COURTESY OF: Daniel E. Johnson, Wealthy Street Photography
Figure 9 (above): This is an gentler twist that helps massage the psoas and the organs and intestines. If you are very stiff, start with this one. Fold one or two blankets so that they are about the size of your torso and lay evenly on the ground. Starting on one side, place one hip at the base of the blankets, then separate your legs as pictured, and gently twist your body from the lower abdomen first, so that your whole abdomen front lays on the blanket. Rest there for several minutes.
PSOAS RESTING STRETCH
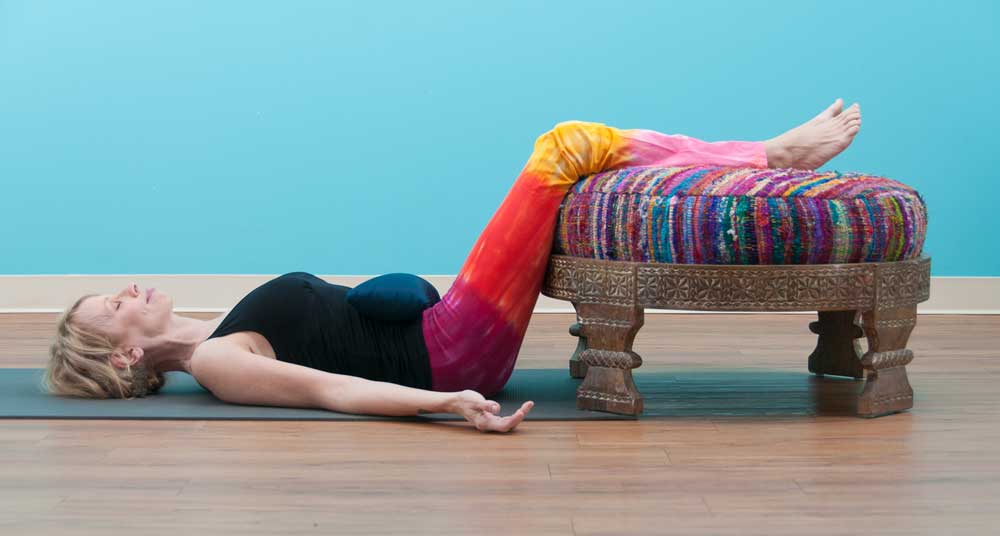 Figure 10: PICTURED: Melanie McQuown, PeaceLab Yoga. PHOTOS COURTESY OF: Daniel E. Johnson, Wealthy Street Photography
Figure 10 (above): Finally, place your lower legs up onto a chair or a bench. Let the the body sink into the floor. If you have a heavy blanket, or a sand bag (as pictured above), place it over your lower belly from hip to hip. This is a very lovely and easy way to relax the psoas muscle at any time. Practice this by itself or after a work out.
Many thanks to Melanie McQuown of PeaceLabYoga.com for offering this series of poses and demonstrating them so we can all give them a try. Thanks also to Daniel E. Johnson of Wealthy Street Photography for these beautiful photographs of Melanie!
About the Author
 Writer, owner of Blue Pearl Strategies, and lover of all culinary delights, Elisabeth is the Tender Foodie. She started this blog and The Tender Palate, a website for foodies with food allergies where she consults with experts from every area of the Tender Foodie life. She believes that everyone should live deliciously and have a healthy seat at the table.
Reader Comments (4)
PLEASE NOTE: BEFORE TRYING ANY NEW EXERCISE ROUTINE, PLEASE CHECK WITH YOUR DOCTOR and work with an EXPERIENCED YOGA INSTRUCTOR. Some of these poses, especially twists, may not be appropriate for those with osteoperosis or disc degeneration.