Support the Work

If you have found the information on this blog useful, enjoyable, candid, or inspirational ... help keep it reader supported, journalistically driven, available to all, and advertiser-free. If you are able and inspired to do so, please consider a subscription to this blog. You can drop a dime or two every month, every year, or whenever you feel moved.

It will keep me writing, gathering facts, and interviewing the experts.

Love,

Elisabeth

CLICK HERE TO SUPPORT THE WORK

Parent / Sponsor


NEED TO FIND SOMETHING?
Join The Email List

Get Tastiness to Your Inbox

* indicates required

A blog about all things allergen-free and delicious

Entries in dairy-free (49)

Tuesday
Feb042014

Honey-Infused Chocolate Covered Bacon (using raw cacao)

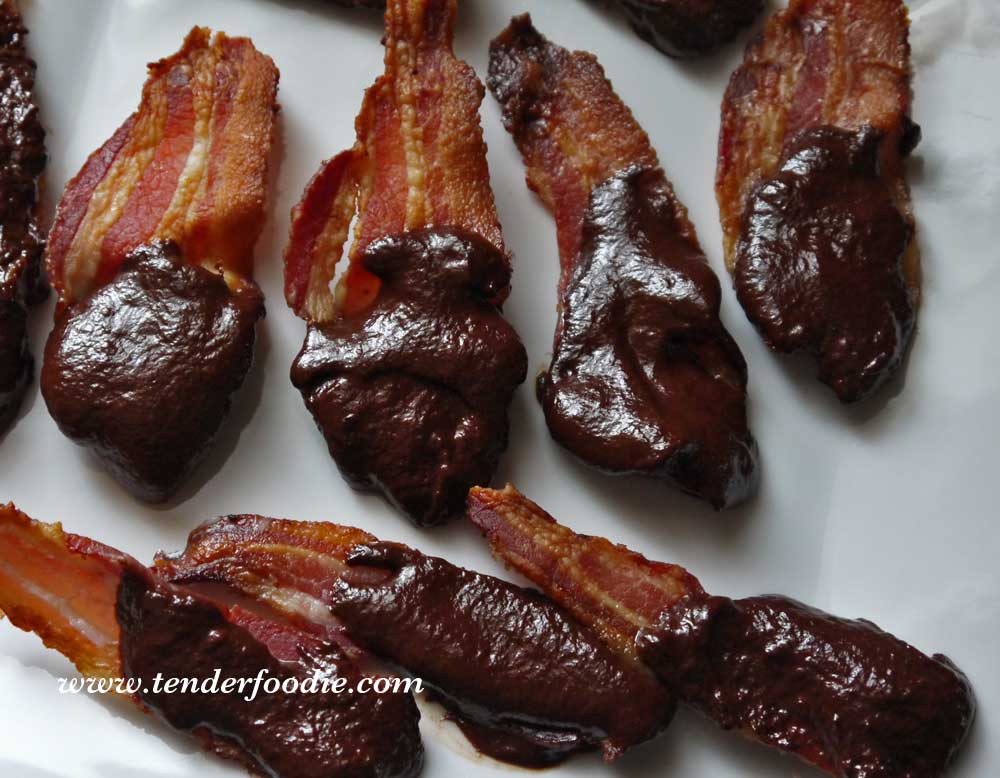
In the last post, we learned that yes, you can cook bacon naked, and without peril to your naughty bits, if you simply cook it in the oven. It's easy, saves time, does not splatter, and this method helps you save or toss the grease without mess. For this chocolate-covered bacon recipe, you need evenly cooked bacon that stands at attention, so using the oven is the best way to acheive this.

We've also learned that bacon can stop an argument on a dime, just by its mere mention. If this legend is indeed true, then chocolate covered bacon will one day bring about world peace.

For those of you who have removed cane or beet sugar from your diet, the ganache for this recipe is made from honey, and you will love it.

Ingredients

Here is what you will need:

(Double this recipe for 1 lb of bacon. If using more than one pound, make the ganache in batches for 1 lb of bacon at a time)


 Recipe

In your small saucepan or stove-safe ceramic dish, bring the coconut oil and honey to a boil by placing the burner on high. It will start to bubble like this:


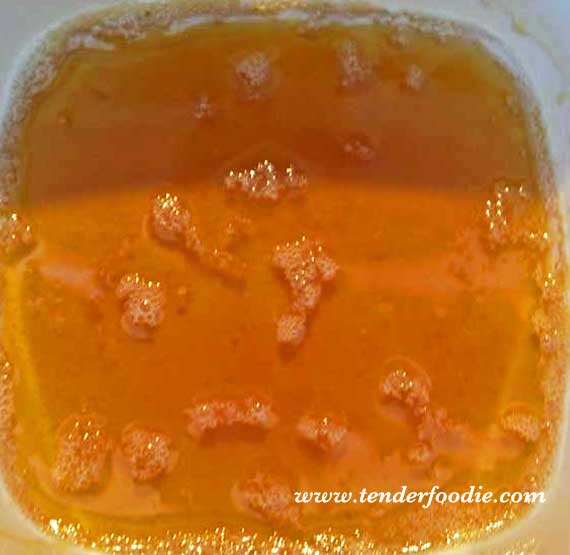
Keep the pan on the stove until the honey and oil come to a full boil like the picture below. Let it boil for 30 to 45 seconds. No more than 60 seconds as you do not want this to burn. When cold, the ingredients will be separated, but after boiling they will come together and make a sort of caramel.


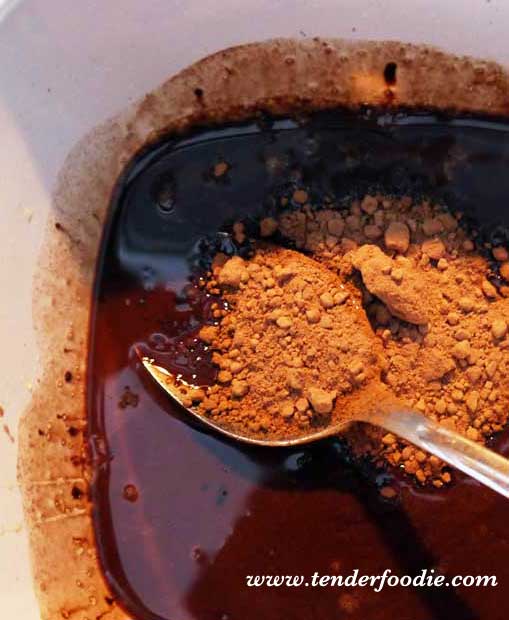
Let the honey and oil mixture cool for 5 minutes. If you place the raw cacoa powder in too early, you may burn it. The mixture should be warm but not hot. When at the right temperature, slowly add in the raw cacao powder a little at a time, stirring to completely incorporporate the chocolate/cacao into the mixture. Keep adding until you get the proper spreading consitency. You will get the right consistency somewhere between 1/8 and 1/4 cup of cacao. I like it a little thicker (so I use almost the entire 1/4 cup), you may like it a little thinner. If you don't use it all, return the extra to the package to use later!


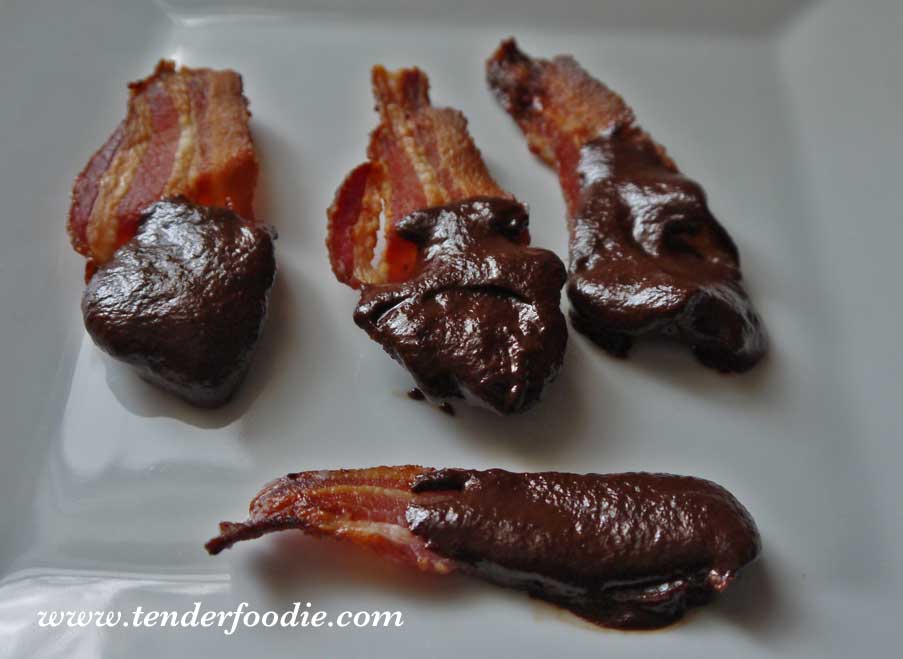
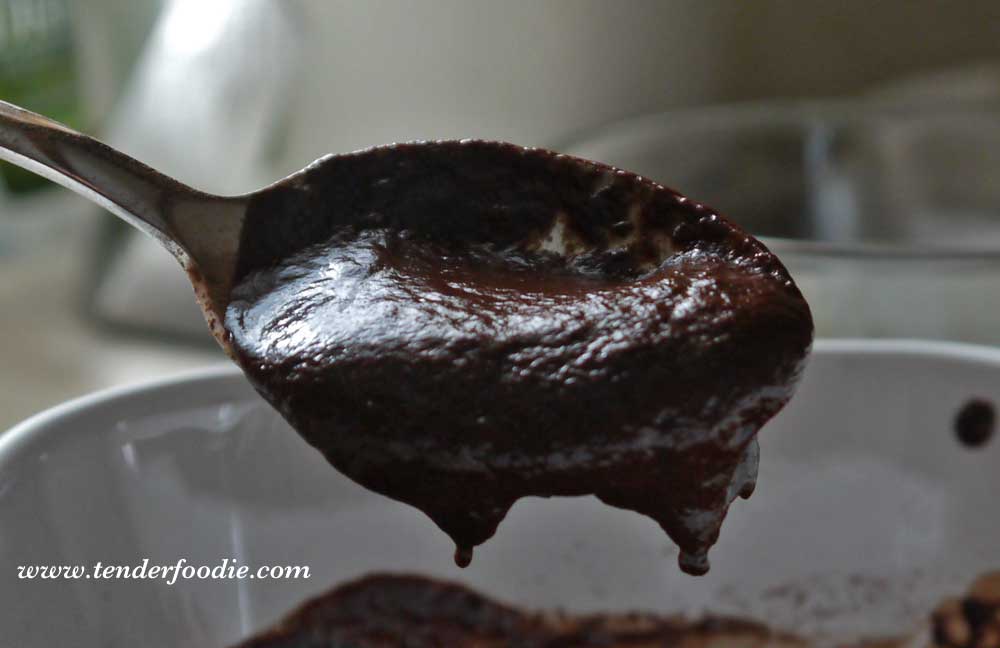
The consitency of the chocolate mixture will look something like this. It will slowly drip off of the spoon, and will be easy to spread.  


Lastly, break the cooked bacon strips in half and using a spoon, spread the chocolate onto one side of the bacon, half way up the strip. Make it a nice thick coat, using the bacon like a spoon. Chocolate lovers can put the chocolate side down on their toungue, while bacon lovers may put the bacon side on their toungue. Each will give you a slightly different experience. Covering one side also helps make the bacon look good on the plate right away. You don't have to use a separate plate to wait for the chocolate to harden and then waste a bunch of chocolate on the plate.

After it hardens a bit, place in the refrigerator, covered, for an hour or overnight. Served best chilled.

Enjoy!  (and have the leftovers for breakfast, seriously).


Friday
Dec282012

Recipe: Roasted Chili Chickpeas


Copyright Elisabeth Veltman

I was first introduced to roasted chick peas by Chef Jenna Arcidiacono when I was looking for a high protein late night snack.  She sent me a link to a recipe, and since there were a few ingredients I could not ingest, I re-invented.  So, voila!  These little babies are quick, easy to make and carry; and are a hit at a party.   Plus, if you are like many Tender Foodies who can't eat safely off of the buffet table, you can eat what you have brought, without having to keep meat in your purse or back pocket.


See Also

Six Tips to Sticking to Your Eating Plan During the Holidays

Top 10 HIdden Sources for Holiday Gluten


INGREDIENTS

2 33 – oz cans chick peas (garbanzo beans)

2 TBS chili powder

1 TBS ground cumin

1 TBS salt (adjust salt to taste)

1 tsp turmeric

1 tsp ground coriander

2 TBS low salt gluten-free tamari sauce

6 TBS olive oil

OTHER OPTIONS

1. Want more heat?  Add 1/2 TBS of Ancho chili powder

2. Want even more heat?  Add an additional 1/2 TBS of Chipotle chili powder

3. You can also add finely minced garlic (3 cloves)

If needed, you could add a little more olive oil if the marinade gets too thick.


MAKE


Preheat the oven to 425 degrees.


Rinse well & drain the chick peas.  Set aside.  Whisk the spices, GF tamari, and olive oil in a bowl. (Mix in optional garlic).  Add the chickpeas and mix until well coated.

Place the coated chick peas in one layer onto a parchment-lined baking sheet. 

Roast for 45 minutes.  Stir half-way through from outside in and re-spread into one layer.  Serve immediately hot or can be served cold the next day.


NO WASTE TIP

FOOD: This marinade is too good to waste.  So toss some roasted turkey or chicken in the bowl (pictured:  Applegate Farms sliced turkey) and coat it with the left over "sauce".  Then make a gluten-free sandwich (see my favorite breads here).  Yum.  I think I'll try this as a pre-grill marinade for chicken.  What do you think?

TIME:  save time by roasting some squash, along with the chickpeas!


Tuesday
Oct022012

Roasted Sweet Potato Chips with Nutmeg & Cinnamon


This is the ultimate, healthy, B, C, and A Vitamin, Beta-Carotene-loaded, and anti-inflammatory-ily spiced side dish.  The fat of the olive oil actually, according to Worlds Healthiest Foods, enhances your bod's ability to absorb the beta carotene.  Cinnamon is one of the most studied spices for its anti-inflammatory benefits, too.  Another side benefit of this side, is the sweet potato's high content of tryptophan, which might make those late night rummagings a sleep-supporting win. 

Plus, if you need some lovin', this recipe is a quickie. 


Preheat Oven to 425 degrees

Ingredients

2 large sweet potatoes

1-2 TBS of olive oil

1-1/2 tsp sea or kosher salt

3 tsp of cinnamon (approximate - size of potatoes vary a great deal)

1/4 tsp of fresh grated nutmeg (approximate - just kiss each potato as you grate the nutmeg on the top)


Combine & Roast

On a sheet pan, place a sheet of parchment paper.  I like to use parchment because it helps veggies brown and caramalize, saves the pan (and if you place it correctly, you don't have to wash the pan... shhhh.  Don't tell anyone).

Slice the sweet potatoes to be about 1/4 inch thick for soft potatoes and quite thin for actual chips.  The thinner you slice them, the crispier the potato chips will be.   Both are really good.

Place the chips on the parchment lined pan, then pour about 1 TBS of olive oil in your hand.  Massage the oil over each sweet potato chip - tossing with your hands.  Then sprinkle the salt evenly over the chips, and again toss the chips in your hands to spread the salt to both sides of the potatoes.  Add more oil & salt if needed - depending upon the size of your tubers.

Evenly space the potatoes on the parchment - you want each chip's little bottom to be on the parchment (don't double up).  this way the bottom will be browned.  Sprinkle the cinnamon evenly over the top of each chip.  You can use a sifter to be exact, if you like.  I tend to use my fingers to pinch a little over the top of each.  Then grate a kiss of fresh nutmeg over each chip.

Place into the pre-heated oven and roast for 30-40 minutes.  Serve hot.

Makes a great partner to soup or roast chicken, or your favorite gluten-free sandwich.


READER TIP 

Add a pinch of cayenne to your cinnamon for a little kick.  Thanks Marti & Lori!


A NOTE ON NUT ALLERGIES & NUTMEG

According to FAAN (Food Allergy & Anaphylaxis Network), Is nutmeg safe?

"Nutmeg is obtained from the seeds of the tropical tree species Myristica fragrans. It is generally safe for an individual with a tree nut allergy."


Thursday
Sep062012

Recipe: Chimichurri Steak Salad


Our House

Our house in not air-conditioned, so during the sweltering days of summer, I resist spending hours cooking over a hot stove. This is a very fast recipe that can be made indoors or out, over the grill. It came to me out of convenience: I had a few chimichurri-marinated steak kabobs and a sliced vegetable pack from my local market and simply put it all together. Much of the flavor of the dish comes from the chimichurri sauce, and the balsamic-glazed grilled vegetables add a nice piquancy. If you can find the vegetable pre-sliced (I bought mine at Trader Joe’s), and marinated steak kabobs, by all means take the shortcut. Dinner will be ready that much sooner! If you want to make the dish from scratch, it doesn’t take much longer, and it tastes elegant enough to serve to company. Best of all, it’s naturally gluten-free, dairy-free, soy-free, grain-free and nut-free and perfect for your TenderFoodie!

© Kyra Bussanich, 2012

Serves 2 hungry TenderFoodies!

Ingredients


Chimichurri sauce (recipe to follow)
8 ounces steak bits
8 ounces washed lettuce or salad mix
3 tablespoons olive oil
1 tablespoon balsamic vinegar
salt and pepper to taste
½ red onion, sliced
4 ounces sliced crimini mushrooms
½ bunch (about 12 spears) baby asparagus, trimmed and cut into 2-inch pieces

Chimichurri sauce (recipe from Epicurious.com)

1/2 cup (packed) fresh Italian parsley
1/4 cup olive oil
3 tablespoons red wine vinegar
2 tablespoons (packed) fresh cilantro
2 garlic cloves, peeled
1/2 teaspoon dried crushed red pepper
1/4 teaspoon ground cumin
1/4 teaspoon salt


Put it Together


Add all ingredients to a food processor bowl fitted with a blade. Puree until uniform in texture (should not be a paste, but rather have some lumps and texture to it).


Place the chimichurri and the steak bits in a plastic bag, seal the end and squish the meat around to coat it with the chimichurri sauce. Meanwhile, wash and slice the vegetables and divide the salad between 2 plates. Set the salad aside. On the stove top or grill, heat a large sauté pan with the 2 tablespoons of olive oil and add the mushrooms and red onion slices, and a pinch of salt and pepper. Sauté over medium heat until the edges of the mushrooms and onions start to caramelize and the onions are translucent, about 5 minutes. Add the asparagus and the balsamic vinegar and sauté until the asparagus is tender, about 3 more minutes. Remove the vegetables from the pan and set aside. Pour the chimichurri sauce and steak bits into the pan and sauté until the steak is done to your tastes, about 2 minutes.


Add the vegetables to the steak and toss to coat the veggies in the remnants of the chimichurri sauce, and divide the contents of the pan over the two salad plates.


Enjoy!


About Kyra

Kyra Bussanich is the owner of Crave Bake Shop, and the first gluten-free winner of the Food Network's Famed, "Cupcakes Wars".  Kyra graduated with honors from the prestigious Le Cordon Bleu patisserie program, which gave her a solid foundation of knowledge about classical French baking techniques which she was able to apply toward baking gluten-free.  Kyra was diagnosed with an auto-immune disorder when she was 20 years old. Part of staying healthy meant switching to a gluten-free diet, avoiding all wheat and overly processed foods. Whenever possible, she uses local ingredients, and serves customers with multiple allergies, as well.

Monday
Aug272012

Recipe: Peach Crumble (gluten-free, dairy-free)


Recipe from Brooke Kaufman at Balance Within Nutrition.


Ingredients

6 large yellow peaches, sliced

1 Tablespoon fresh lemon juice

1 Tablespoon gluten-free vanilla extract

3 Tablespoons arrowroot powder

1 ½ cups  gluten-free almond flour or coconut flour

½ teaspoon  sea salt

¼ cup coconut oil, melted

¼ cup honey or organic brown sugar


Directions

    1.    Place peach slices in a large bowl, sprinkle with lemon juice, vanilla, and arrowroot; toss to incorporate all ingredients, and place mixture in a 3 quart baking dish.


    2.    In a smaller bowl, combine the flour, salt, coconut oil and honey or brown sugar for topping mixture.

    3.    Crumble the topping over top of peach mixture.

    4.    Bake covered at 350° for 45 minutes, until peach juice is bubbling.

    5.    Remove cover and bake a few more minutes if topping is not yet browned.

    6.    Serve as is, or with a dollop of your favorite dairy-free ice cream, or coconut cream. Enjoy!