Support the Work

If you have found the information on this blog useful, enjoyable, candid, or inspirational ... help keep it reader supported, journalistically driven, available to all, and advertiser-free. If you are able and inspired to do so, please consider a subscription to this blog. You can drop a dime or two every month, every year, or whenever you feel moved.

It will keep me writing, gathering facts, and interviewing the experts.

Love,

Elisabeth

CLICK HERE TO SUPPORT THE WORK

Parent / Sponsor


NEED TO FIND SOMETHING?
Join The Email List

Get Tastiness to Your Inbox

* indicates required

A blog about all things allergen-free and delicious

Entries in soy-free (19)

Tuesday
Feb042014

Honey-Infused Chocolate Covered Bacon (using raw cacao)

In the last post, we learned that yes, you can cook bacon naked, and without peril to your naughty bits, if you simply cook it in the oven. It's easy, saves time, does not splatter, and this method helps you save or toss the grease without mess. For this chocolate-covered bacon recipe, you need evenly cooked bacon that stands at attention, so using the oven is the best way to acheive this.

We've also learned that bacon can stop an argument on a dime, just by its mere mention. If this legend is indeed true, then chocolate covered bacon will one day bring about world peace.

For those of you who have removed cane or beet sugar from your diet, the ganache for this recipe is made from honey, and you will love it.

Ingredients

Here is what you will need:

(Double this recipe for 1 lb of bacon. If using more than one pound, make the ganache in batches for 1 lb of bacon at a time)


 Recipe

In your small saucepan or stove-safe ceramic dish, bring the coconut oil and honey to a boil by placing the burner on high. It will start to bubble like this:


Keep the pan on the stove until the honey and oil come to a full boil like the picture below. Let it boil for 30 to 45 seconds. No more than 60 seconds as you do not want this to burn. When cold, the ingredients will be separated, but after boiling they will come together and make a sort of caramel.


Let the honey and oil mixture cool for 5 minutes. If you place the raw cacoa powder in too early, you may burn it. The mixture should be warm but not hot. When at the right temperature, slowly add in the raw cacao powder a little at a time, stirring to completely incorporporate the chocolate/cacao into the mixture. Keep adding until you get the proper spreading consitency. You will get the right consistency somewhere between 1/8 and 1/4 cup of cacao. I like it a little thicker (so I use almost the entire 1/4 cup), you may like it a little thinner. If you don't use it all, return the extra to the package to use later!


The consitency of the chocolate mixture will look something like this. It will slowly drip off of the spoon, and will be easy to spread.  


Lastly, break the cooked bacon strips in half and using a spoon, spread the chocolate onto one side of the bacon, half way up the strip. Make it a nice thick coat, using the bacon like a spoon. Chocolate lovers can put the chocolate side down on their toungue, while bacon lovers may put the bacon side on their toungue. Each will give you a slightly different experience. Covering one side also helps make the bacon look good on the plate right away. You don't have to use a separate plate to wait for the chocolate to harden and then waste a bunch of chocolate on the plate.

After it hardens a bit, place in the refrigerator, covered, for an hour or overnight. Served best chilled.

Enjoy!  (and have the leftovers for breakfast, seriously).


Tuesday
Oct022012

Roasted Sweet Potato Chips with Nutmeg & Cinnamon


This is the ultimate, healthy, B, C, and A Vitamin, Beta-Carotene-loaded, and anti-inflammatory-ily spiced side dish.  The fat of the olive oil actually, according to Worlds Healthiest Foods, enhances your bod's ability to absorb the beta carotene.  Cinnamon is one of the most studied spices for its anti-inflammatory benefits, too.  Another side benefit of this side, is the sweet potato's high content of tryptophan, which might make those late night rummagings a sleep-supporting win. 

Plus, if you need some lovin', this recipe is a quickie. 


Preheat Oven to 425 degrees

Ingredients

2 large sweet potatoes

1-2 TBS of olive oil

1-1/2 tsp sea or kosher salt

3 tsp of cinnamon (approximate - size of potatoes vary a great deal)

1/4 tsp of fresh grated nutmeg (approximate - just kiss each potato as you grate the nutmeg on the top)


Combine & Roast

On a sheet pan, place a sheet of parchment paper.  I like to use parchment because it helps veggies brown and caramalize, saves the pan (and if you place it correctly, you don't have to wash the pan... shhhh.  Don't tell anyone).

Slice the sweet potatoes to be about 1/4 inch thick for soft potatoes and quite thin for actual chips.  The thinner you slice them, the crispier the potato chips will be.   Both are really good.

Place the chips on the parchment lined pan, then pour about 1 TBS of olive oil in your hand.  Massage the oil over each sweet potato chip - tossing with your hands.  Then sprinkle the salt evenly over the chips, and again toss the chips in your hands to spread the salt to both sides of the potatoes.  Add more oil & salt if needed - depending upon the size of your tubers.

Evenly space the potatoes on the parchment - you want each chip's little bottom to be on the parchment (don't double up).  this way the bottom will be browned.  Sprinkle the cinnamon evenly over the top of each chip.  You can use a sifter to be exact, if you like.  I tend to use my fingers to pinch a little over the top of each.  Then grate a kiss of fresh nutmeg over each chip.

Place into the pre-heated oven and roast for 30-40 minutes.  Serve hot.

Makes a great partner to soup or roast chicken, or your favorite gluten-free sandwich.


READER TIP 

Add a pinch of cayenne to your cinnamon for a little kick.  Thanks Marti & Lori!


A NOTE ON NUT ALLERGIES & NUTMEG

According to FAAN (Food Allergy & Anaphylaxis Network), Is nutmeg safe?

"Nutmeg is obtained from the seeds of the tropical tree species Myristica fragrans. It is generally safe for an individual with a tree nut allergy."


Thursday
Sep062012

Recipe: Chimichurri Steak Salad


Our House

Our house in not air-conditioned, so during the sweltering days of summer, I resist spending hours cooking over a hot stove. This is a very fast recipe that can be made indoors or out, over the grill. It came to me out of convenience: I had a few chimichurri-marinated steak kabobs and a sliced vegetable pack from my local market and simply put it all together. Much of the flavor of the dish comes from the chimichurri sauce, and the balsamic-glazed grilled vegetables add a nice piquancy. If you can find the vegetable pre-sliced (I bought mine at Trader Joe’s), and marinated steak kabobs, by all means take the shortcut. Dinner will be ready that much sooner! If you want to make the dish from scratch, it doesn’t take much longer, and it tastes elegant enough to serve to company. Best of all, it’s naturally gluten-free, dairy-free, soy-free, grain-free and nut-free and perfect for your TenderFoodie!

© Kyra Bussanich, 2012

Serves 2 hungry TenderFoodies!

Ingredients


Chimichurri sauce (recipe to follow)
8 ounces steak bits
8 ounces washed lettuce or salad mix
3 tablespoons olive oil
1 tablespoon balsamic vinegar
salt and pepper to taste
½ red onion, sliced
4 ounces sliced crimini mushrooms
½ bunch (about 12 spears) baby asparagus, trimmed and cut into 2-inch pieces

Chimichurri sauce (recipe from Epicurious.com)

1/2 cup (packed) fresh Italian parsley
1/4 cup olive oil
3 tablespoons red wine vinegar
2 tablespoons (packed) fresh cilantro
2 garlic cloves, peeled
1/2 teaspoon dried crushed red pepper
1/4 teaspoon ground cumin
1/4 teaspoon salt


Put it Together


Add all ingredients to a food processor bowl fitted with a blade. Puree until uniform in texture (should not be a paste, but rather have some lumps and texture to it).


Place the chimichurri and the steak bits in a plastic bag, seal the end and squish the meat around to coat it with the chimichurri sauce. Meanwhile, wash and slice the vegetables and divide the salad between 2 plates. Set the salad aside. On the stove top or grill, heat a large sauté pan with the 2 tablespoons of olive oil and add the mushrooms and red onion slices, and a pinch of salt and pepper. Sauté over medium heat until the edges of the mushrooms and onions start to caramelize and the onions are translucent, about 5 minutes. Add the asparagus and the balsamic vinegar and sauté until the asparagus is tender, about 3 more minutes. Remove the vegetables from the pan and set aside. Pour the chimichurri sauce and steak bits into the pan and sauté until the steak is done to your tastes, about 2 minutes.


Add the vegetables to the steak and toss to coat the veggies in the remnants of the chimichurri sauce, and divide the contents of the pan over the two salad plates.


Enjoy!


About Kyra

Kyra Bussanich is the owner of Crave Bake Shop, and the first gluten-free winner of the Food Network's Famed, "Cupcakes Wars".  Kyra graduated with honors from the prestigious Le Cordon Bleu patisserie program, which gave her a solid foundation of knowledge about classical French baking techniques which she was able to apply toward baking gluten-free.  Kyra was diagnosed with an auto-immune disorder when she was 20 years old. Part of staying healthy meant switching to a gluten-free diet, avoiding all wheat and overly processed foods. Whenever possible, she uses local ingredients, and serves customers with multiple allergies, as well.

Tuesday
Aug142012

Back to School Shopping for a Tender Foodie's Lunch

IT'S THAT TIME ALREADY?

YIKES!  It’s August and it’s already time for back to school shopping.  Got pencils, notebooks, glue sticks?  Got any ideas for what to pack for school lunches, especially for a Tender Foodie?  I do.

Here’s the deal: I’m all for those adorable little gadgets and  Bento boxes with food arranged into creative scenes from the latest episode of Spiderman®  - you know, the ones made out of intricately-sliced red peppers and black beans and celery strands fashioned into a spider web.  But, the first few weeks of school are so HECTIC – who has time?  Take the pressure off and try some of these new, healthy and allergy-friendly alternatives in convenient small portions for kids of any age.  Yes, they cost a bit more and perhaps you might not put these in your kids’ lunches/snacks every day, but that also makes them a nice treat every once in a while. 

(See Notes on Potential Allergens at the end of the Article).


FRUIT BLISS™

Let go of the stress and start experiencing a little Bliss.  Fruit Bliss’ ™ soft, dried and unsulphured (preservative-free) Turkish apricots come in a mini 1.76 package.  Moist but not sticky, they’re packed with iron and fiber.  They’re Certified Vegan and Non GMO Project Verified and just plain delish!  The mini apricots are sold at 39 Whole Foods stores across the Mid-Atlantic region, as well as many natural food stores from Maine down to Florida.  Want some now?  Use coupon code 10FRUIT for 10% off any order online.


COCOMAMA™

For kids old enough to operate a microwave in their cafeteria, try Cocomama™ Quinoa Cereals in Banana Cinnamon, Wild Blueberry and Orange Cranberry flavors.  Simply tear open the BPA-free pouch and warm slightly for 20 seconds and 

wah-lah – it’s quinoa! That means scrumptious gluten-free, dairy-free, soy-free and vegetarian organic quinoa sweetened with light coconut milk and other yummy ingredients.  Unlike oatmeal, which can transform into glue in a matter of minutes, kids will love the consistent texture with no extra lumps, bumps or worse - drippiness. Cocomama™  is currently available in 28 Whole Foods in the North Atlantic Regionand launching this month with Whole Foods nationally, as well as Wegman’s stores in September.  


Just as easy, go online to purchase 6-packs for $21 (10% discount over retail).  The convenience and peace of mind knowing your child is having a nutritious  protein-rich food when you need a quick addition to the lunch box makes it worth it.  Plus, shipping for ANY order is always $3.99, so stock up.  


purely elizabeth™

Recently, purely elizabeth™ created mini packs of their fabulous ancient grain granolas.  Gluten-free certified, soy-free, no refined sugar and made with organic ingredients whenever possible, the 2 oz. bag mini bags even serve as their own bowl.  Just pour in milk or a dairy-free alternative  or ok, don’t;  I am  all for pouring it straight into your mouth.  My fave is the Pumpkin Fig, but just as yummy are the Cranberry Pecan, Blueberry Hemp and Original flavor.  A case of 8 bags is $22.  Try packing a tall container (I love a Ball canning jar) of yogurt with alternate layers of frozen fruit to keep it cold till lunchtime.  Your kids can add the granola on top for an instant yogurt parfait! 


Simple Squares™

If your Tender Foodie can enjoy nuts, try a Simple Squares™snack bar.  Choose from 4 flavors: Cinnamon Clove, Sage, Rosemary or Coconut.  Each kosher bar is infused with organic herbs and contains unsweetened coconut, organic nuts, 

organic honey, organic vanilla and a touch of sea salt.  Made of “unfired fare™” to maintain the integrity of the nutrient rich bars, the sweet treats contain just 10 grams of sugar (must be the lovely organic honey) and a whopping 10% daily value of iron and 6 grams of protein.  Now, that’s a satisfying snack that’s also good for your kids.  Sold in natural food stores, via  Abesmarket.com or simply visit the Simple Squares™  website, and use the coupon code GFD to get 10% off of these nutritious sweets!


Notes on potential allergens:


Fruit Bliss™ products are produced in a facility that processes soy, milk, egg, wheat, peanuts and tree nuts.  

Cocomama™ products are not manufactured in a gluten-free facility, but the line is cleaned thoroughly and each batch is tested to 10 pmm. The products are gluten-free, dairy-free, and soy-free, but are not necessarily peanut or tree nut-free since that is not part of their testing process.

Purely elizabeth™ granolas are certified vegan by Vegan Action, certified gluten-free by GFCO and are non-GMO Project Verified. 

Simple Squares™ are certified gluten-free and are soy and dairy-free with no refined sugars. Simple Squares packaging states “Good manufacturing practices are used to segregate ingredientsin a facility that processes other products, which may contain peanuts, tree nuts, wheat (gluten), milk, soy and/or eggs."


About Melanie

Melanie Potock, MA, CCC-SLPMelanie Potock is speech language pathologist who specializes in feeding.  Her work brings her into the homes and schools of her clients, kids, who for various reasons have difficulty with food or with eating. She works with kids and their parents to develop effective strategies that help children become “more adventurous eaters”.  At least 50% of her clients have food allergies or intolerances, and for them, “adventurous eating” takes on a special meaning.  Melanie is also the author of Happy Mealtimes with Happy Kids” and the executive producer of “Dancing in the Kitchen.”


More Posts From Melanie

Why Children with Autism are Often Picky Eaters

Review:  The Magic of the BellyFull Kit (From the Hopeful Company)

The 12 Days of Christmas -- My Favorite Lunchtime Things (Part 1)

Tips to Help Your Food Allergic Child Belong During the Holidays

How to Talk Turkey (and Food Allergies) at Thanksgiving

How Can Parents Feel Less Stress with a Food Allergic Child in School?

Follow Your Gut:  What's Eating My Daughter's Stomach? (Part I)

Thursday
Jul192012

My Favorite Gluten-Free Breads

As seen in Women's Lifestyle Magazine's July/August 2012 Edition


BREAD IS YUMMY

When I speak to people who are newly diagnosed with a gluten allergy, sensitivity, or celiac disease, they nearly all say, “I miss bread!” Bread has become a huge part of our food culture.  The gluten in bread helps make it taste really good. It lends flavor, elasticity, and general “yumminess.” Bread is a comfort, a joy. Don’t take away my bread!! But alas, we need alternatives. With multiple allergies on the rise as well, these alternatives must be creative.


WHY “GOOD” ALLERGEN-FREE BREAD IS DIFFICULT TO FIND (AND MAKE)

Pastry Chef, Kyra Bussanich is the first Gluten-free winner of the Food Network’s Cupcake Wars.

She owns CRAVE BAKE SHOP in Lake Oswego, Oregon and is a guest writer for The Tender Palate. I asked Kyra why allergen-free bread is so tough to make:

There are three legs to fantastic baking: gluten, eggs, and sugar. Each contributes something to the texture and structure of the final product, and when you have already replaced one of the legs of the stool, it makes it more difficult to successfully swap out the remaining two legs without adversely affecting flavor or texture (or both).  This is why gluten-free and egg-free baking presents such a challenge.

~Kyra Bussanich, Owner of Crave Bake Shop

The good news is that you don’t have to travel to Oregon to get your comfort on. Here are a two of my favorite breads that you can get off the shelves in your ‘hood and one of my favorite sweet bread recipes that people have been loving.


MY FAVORITE BREAD MIXES

Breads From Anna – Bread Mix (All Purpose Flour Blend)

*Free of Gluten, Yeast, Corn, Dairy, Soy, Nuts, Peanuts, Rice, and GMO

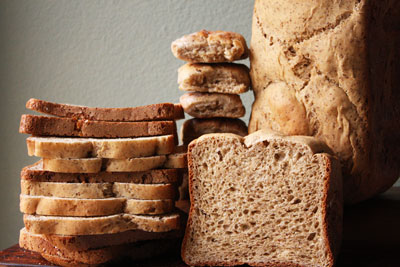
I absolutely love this bread mix. It is sensuous, tasty, and versatile. I’ve used it for open-faced sandwiches, I’ve eaten it plain, and I’ve made stuffing out of it. It is the ultimate comfort bread with or without any kind of butter. Pictured at top is Anna’s sandwich bread, which is lighter and has a bit more structure to it. The All Purpose Flour Blend is fairly dense, which I happen to like, and this is the best bean flour bread that I’ve ever tasted. A side benefit of the Breads from Anna mixes is that they are high in protein and fiber, and quite nutritious!  So pay attention if you are a carbo-loader, this bread will make things happen, if you know what I mean. The mixes are easy to make, and though a bit pricey, they are totally worth it, kids.

Though Breads for Anna has not gone for certification, each ingredient is tested prior to making it to her factory.  She has a completely gluten-free processing plant and does not process any of the top eight allergens in her factory.

 “I have Celiac Disease and Type I Diabetes.  I knew a lot of people needed this and I eat my own products. I feel a lot of responsibility to my customers. You have to be committed in this market.  When I say it’s GMO-free and Gluten-free, I mean it.”

~Anna Sobaski, Owner, Breads from Anna


Chebe – All Purpose Bread Mix

*Gluten-free, can be made Dairy-free.  Does not contain any rice, nuts*, dairy or yeast (see below for processing).


Oh, this bread is wonderful. It is a little crusty on the outside with a wonderfully soft, chewy texture in the middle. It lends such a nice flavor to the sandwich itself, and has a truly crave-worthy texture. I first used it as a hamburger bun and it even held the olives and the organic ketchup on the burger. No mess! I’ve since used it for chicken salad, turkey, and a BLT!

I first saw a Facebook advertisement for Chebe and was intrigued. I wrote to the company for a sample and they immediately sent me a few mixes. This was fantastic because I was able to make their products several times. I found it easier to work the bread with a little olive oil already on my hands.  Kneed this dough well. It will feel like normal gluteny/yeasty dough, just a little stickier. If you do not use cheese (or even if you do) brush the top with olive oil to help it brown and add a sprinkle of sea salt to the top to round out the flavor. If you don’t use all of the resulting rolls, freeze them right away and they thaw and warm beautifully.

Though they do not test for anything but gluten (and they test to 5ppm which we love!), their mixes also do not contain a whole host of other common allergens like rice, nuts, yeast, dairy, etc. So compare your allergy needs to Chebe’s processing. Their factory line does have a separate, nut-free room, for instance, but it does not have a separate nut-free factory.


MY FAVORITE SWEET RECIPE:  DUTCH CINNAMON BREAD

Copyright:  Elisabeth Veltman

*Free of gluten, dairy, soy, rice, nuts, peanuts, yeast

Dutch Cinnamon Bread

This is a great recipe to make on special occasions or to bring to a brunch. It’s flavorful, and is a sweet, soft dessert bread. I find most gluten-free breads, even the good ones, to have a slight hole in the middle of the flavor. The sweet and spicy of this recipe fills that gap deliciously.

Pre-heat oven to 350 degrees

Bread Ingredients:

1 egg
1 cup sugar
1/4 cup sunflower, safflower or similar oil (a neutral oil is best, although coconut oil would work and lend a little coconut flavor)
1 cup GF teff flour
1 cup GF buckwheat flour
1/2 tsp. salt
1 tsp baking soda
1 can Thai Kitchen Coconut Milk (you need the can to include the coconut fat)

Topping / Swirling Ingredients

1/2 cup sugar
1 T. cinnamon

(In a prep bowl, mix these together and set aside.)

Grease a 9x5x3 loaf pan (use the same oil you are baking with). In a food processor or mixer, beat the egg, sugar and oil together until creamy. In a separate bowl, sift together the flour, salt and soda. Remove the coconut milk from the can into a bowl, and beat the fat into the rest of the milk. Add the flour mixture to the egg/sugar mixture alternatively with the coconut milk until blended. Pour 1/2 of the batter into the loaf pan. Sprinkle the top with 1/2 of the cinnamon sugar mixture. Add the rest of the batter to the pan, and then sprinkle the remaining cinnamon sugar over the top. Using a knife, swirl the sugar into the bread in a figure eight type pattern. Bake 1 hour. Cool for at least 30 min. then remove from the pan.  Slice and serve.  This bread freezes really well.


OTHER GLUTEN-FREE BREAD RESOURCES

Reprinted with permission from Women's Lifestyle MagazineThere is a wonderful recipe site run by Elana Amsterdam. She has Paleo Bread Recipes that I adore.
They are grain-free (made with nut flours, and high protein).  Find them at www.elanaspantry.com

I’m not able to eat these breads because of my specific allergies, but my readers often tout these brands:

Udi’s multi-grain is a consistent favorite.  Find them at www.udisglutenfree.com/

Genius Breads is a new favorite.  Find them at www.geniusglutenfree.com

Rudi’s Gluten-Free Bakery at www.rudisglutenfree.com is another that is mentioned by readers.


ABOUT THE AUTHOR:

Writer, owner of Blue Pearl Strategies, and lover of all culinary delights, Elisabeth is a Tender Foodie. She started The Tender Palate, a website for foodies with food allergies where she consults with experts from every area of the Tender Foodie life. She believes that everyone should live deliciously and have a healthy seat at the table. Find her at www.tenderpalate.com.